Audits
When you do an inventory count, you’ll want to set the inventory in each Storage Location to the physical count. That’s what the Audits function is for.
The big thing you need to remember is that Audits have to be ‘finalized’ by an organization admin before they update the inventory, so don’t record any activity after the physical count until the Audit is finalized.
Starting an Audit
Click on “Inventory”, then “Inventory Audit” in the left hand menu, then “+New Audit”.

This brings up the new Audit page.

Specify the Storage Location, then each Item you have counted, along with its quantity.
[!NOTE] You can do partial Audits. Any Item you don’t specify during the Audit will keep its current quantity in the inventory.
Clicking “Save Progress” saves what you have done, but you can come back and continue entering. You must choose a Storage Location to save progress.
Clicking “Submit for final approval” and clicking “OK” in answer to “Are you sure?” will set the status to “Pending Finalization” - that is, ready for an organization admin to review and “finalize” - so that should be done when you are finished your counts and have checked that you entered the right numbers.
When you save progress, you’ll see this page, which shows the progress of the Audit. Anything you haven’t counted has a red background, and is noted as “Not Audited”.

You will be able to return to this page from the list of Audits (Inventory – Inventory Audit).
The Audit Quantity is the amount that you entered, and the Quantity in Records is the amount that is currently recorded as being in your inventory.
You have two options from this page: Resume Audit and Delete Audit, which we treat below.
Resuming an Audit
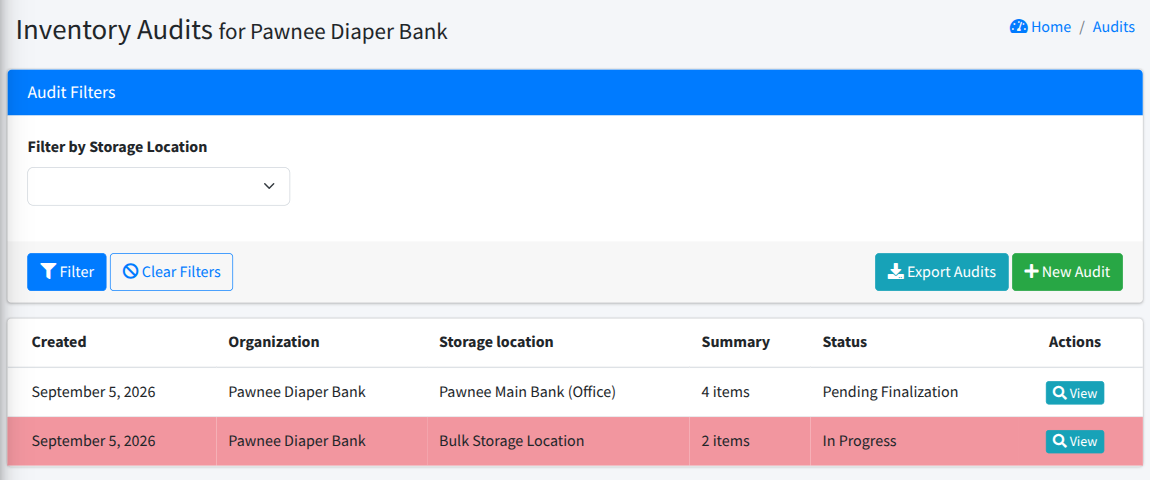
When you want to continue entering your counts, you can resume your Audit by going to the Audits page (Inventory – Inventory Audit). You’ll see the Audit you are working on listed with a status of “In Progress”. Click “View” to bring up the details on that Audit.
 Scroll to the bottom of the page, and click “Resume Audit”

This will bring up the new Audit form you were working on, and you can continue to enter more Items.
You can “Save Progress” again, or you can “Submit for final approval”, and click “OK” in answer to “Are you sure?” to set the Audit for approval (or “Finalizing”) by a user with organization admin privileges.
Audit statuses
An Audit is always in one of three statuses, which you can see in the Audit list (Inventory – Inventory Audit) and in the breadcrumb at the top of the Audit view:
- In Progress – counts are still being entered. Audits in this status are highlighted in red in the list.
- Pending Finalization – the counts have been submitted for final approval, and an organization admin needs to review and finalize the Audit before the inventory changes.
- Finalized – the inventory has been updated to match the Audit. Finalized Audits can’t be changed or deleted.
Submitting an Audit for final approval
When you are entering an Audit, and have completed the counts for that Audit, you submit it for final approval. This indicates that the counts for the Audit are done, and available for final review before being set in stone.
This step is here so that a bank can have users without admin access enter the counts, but have a final check (the “Finalize” step, below) before the inventory levels are permanently changed.
On the Audit entry screen, scroll to the bottom and click “Submit for final approval” (1). (“Save Progress” (2) just saves what you’ve entered so far, without submitting.)

You’ll get a confirmation window that reads:
Are you sure?
Please note that this audit must also be finalized by someone with organization admin rights before changes to inventory will take place.
We strongly recommend completing that step before doing any further actions that affect inventory.
Click “OK”, and the Audit’s status changes to “Pending Finalization”.
Finalizing an Audit
Once an Audit has been submitted for final approval (i.e. its status is “Pending Finalization”), it must be finalized before any inventory changes will take place. Finalizing can only be done by someone with organization admin privileges.
To Finalize an Audit, sign in as an organization admin, Click Inventory, then Inventory Audit.
Select the “View” beside the Audit, review it, and if all is correct, scroll down to the bottom and click “Finalize Audit” (1). Then, if you are sure, click “OK” to confirm.
[!NOTE] You will only see “Finalize Audit” if the Audit’s status is “Pending Finalization”.
[!WARN] ** THIS PERMANENTLY CHANGES THE LEVELS OF INVENTORY AND CANNOT BE UNDONE. *****

Now, when you view the Audit, the quantity in records will match the Audit quantity – until you enter more activity.
Deleting an Audit
If the Audit has not been finalized, you can delete it.
From the Audits page (Inventory – Inventory Audit), click “View” beside the Audit you wish to delete, then scroll to the bottom, click “Delete Audit”, and “OK” to confirm.
[!WARN] This cannot be undone
